What to do with a 24000 Piece Puzzle When You’re Done
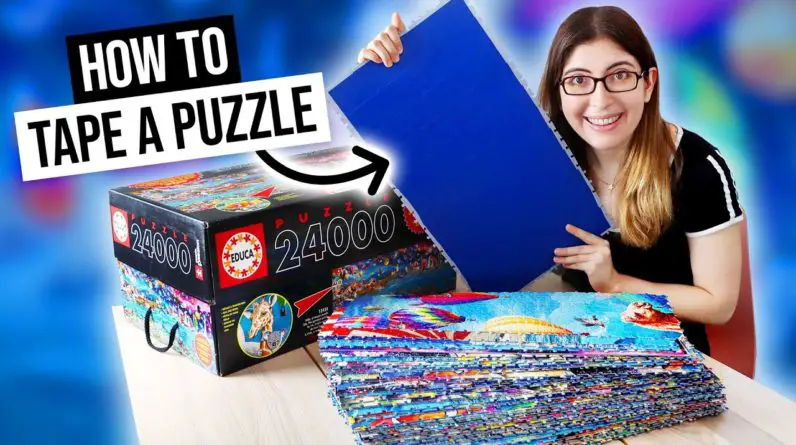
Hi everybody, so i’ve gotten a lot of questions in the comments about how i taped this puzzle into sections so that i could stack them up transport them to my friend’s studio so that i could put the entire thing together. So i actually did a whole tutorial at the end of part, two of the big puzzle series showing exactly how i taped the sections together, but it was at the end of a 40 minute long video. So i know that not everyone watched the entire thing, so i’m going to play that clip again right now and then i’ll be back with more tips and tricks for how to tape a puzzle like this. Now that i’ve done the entire puzzle, [, Music, ] and now here is the million dollar question. What am i going to do with this piece of the puzzle in order to work on the next section?
I’Ve you know talked to my family, about it. Um, the guest that i’ve heard the most is that i made a second one of these boards to just layer on top, and you know that would be fine, but it’s not what i’ve done. What i’m actually going to do is break the puzzle up into sections and then cover the back with a blue tape, and then i can stack up the sections in the box. So that’s actually exactly what i did for both of the 5000 piece gradient puzzles. You can see, i mean they basically look like placemats almost on the back is covered in blue tape, and so it just makes these sections that stack up in the box that i can pick up and move around and then they slot back together.
That’S how i was able to put the first 5 000 piece puzzle back together on the floor in order to show the two of them side by side, so i actually have a little secret for you. I already started covering the back with blue tape, and so half of it is already taped together in sections. Look at that. So each section is 20 pieces by 27 pieces and they just stack right in there [ Music ]. So i do want to walk you through exactly how i do it in case.
Any of you want to try it for yourself, so the first thing to do is to count out where the separation of each section is going to be and then take out a line of pieces and just put them on top of the puzzle piece section so That you can gently kind of pull it away from the rest of the puzzle. Then you can push those pieces back into place and since this puzzle, as i said before, does not hold together at all the pieces do not lock together, you have to be really careful with this part, carefully hold up another piece of foam board and then slide The puzzle onto that second piece then sandwich another piece of foam board on top and pressing them together really tightly flip the whole thing over now you can use blue tape to cover it, covering it first horizontally and then vertically, and i know that there are other Ways to do this like contact paper. I know that there’s like puzzle, specific contact paper, but i found that blue tape is number one really cheap for the amount of space that we’re gon na have to cover, and also since it’s a smaller strip of adhesive. It’S easier to get it right up to the edge of all of the puzzle pieces and since we go both horizontally and vertically, it ends up being really strong. So you can just pick up the entire thing, so you’re just going to repeat that for all of the different sections of the puzzle: [, Music, ], all right.
So, as you can see once they’re taped together, these sections are really strong. When i was putting the entire thing together, i was literally throwing them around and they were totally fine. I would recommend, though, when you’re taping it that you press down really hard on the corners, because these corner pieces can tend to pop off, and so you just have to keep an eye on it and grab them when they fall off. Just because, since we’re not going all the way to the edge, they have a little less tape on them than obviously the ones in the middle. So the tape that i’m using is the 2 inch duck brand painters tape.
I went through a little over an entire roll of this per section of the puzzle, so if you’re doing this exact same puzzle, you would need five rolls of tape. However, i did get a comment that, if i’m planning to keep this for a long time, i should be using acid free, archival, quality tape and they’re, probably right. I just didn’t really think of that. The only issue is that this is a lot of space to cover and acid free tape is a lot more expensive than regular tape. But sometime in the future i will try taping a puzzle with acid-free tape and then i don’t know like 10 years from now i’ll report back and let you know how they’re doing.
I guess there’s really no way, except for time passing to know if it’s really needed or not. Also in the clip earlier, i was just using normal scissors to cut the tape, but if you do that the blades can get really like gunky and sticky, and you have to use adhesive remover to clean them off it’s kind of a hassle. So instead, i would actually recommend using non-stick scissors. These are my favorite scissors in the world. These are the fiskars and duck brand collaboration with the bright green handle.
The blades are completely non-stick, so i have cut so much tape like even duct tape, not just painters tape and the blades never get all gunky. So i’m going to link everything that i’m talking about right down in the description. I also want to clarify that for me, taping a puzzle like this is a permanent solution. Um you can carefully peel off the tape but you’re going to take some of the cardboard with it. So i’m planning to leave the tape on here and then, if i ever want to do it again, but with mixing all the pieces together, i’m gon na get a second copy of the puzzle.
So, as i’ve been saying hopefully someday, i can mount this onto like a piece of wood or some kind of backing so that i can hang it on the wall. But for now, until i live somewhere, a little more permanent breaking it up into sections and taping it together into sections, is the perfect solution to be able to keep a giant puzzle like this together, but still have it be compact enough that i can store it In the original box, plus keeping it like, this gives me the flexibility to put it back together for a video in the future. Just like i did with the 5 000 piece gradient puzzles that i put together on top of this one like imagine this photo, but with a 40 or 50 000 piece puzzle underneath. I hope that i can give you that photo someday and then, of course, if you’re doing a puzzle that actually does hold together well, like i just did this ebu puzzle, which you can see, i can like pick it up and it all stays together. The echuca puzzle could never do that.
It would just crumble apart, but if you’re doing a puzzle like this – and you want to save it in sections of course, you can just stack them up in the box without actually taping them. So i just use the box to see how big each section should be: [, Music ]. Then i separate the sections the same way that i showed you before [ Music ], and then i can just stack them right in there [, Music ] i’ve actually started doing this for pretty much every puzzle that i do these days. That’S how i was able to reassemble the lemonade pursuits puzzle for the video so quickly. You just might also want to put some crumpled paper in the box with the puzzle so that it doesn’t get all shaken around and then make sure to store the box horizontally.
Rather than vertically [ Music ], so i hope that answered all of your questions about how to tape a puzzle together into sections. Let me know in the comments, if there’s anything else, that you want to know about doing this and if you somehow made it to this video – and you haven’t seen all of the videos of me doing the giant puzzle, i’m going to link all of those right Down below so thank you for watching. I hope this video helped and i will see you all soon for more puzzle. Videos,
![[1563] Old School Parental Controls (Homework First NES Lock)](https://puzzlebeat.com/wp-content/uploads/2023/09/1563-old-school-parental-controls-homework-first-nes-lock-sseoSbBA-A8-796x445.jpg)